We now have only 2 days to prepare for the annual celebration of egg hiding and discovery that we call Easter. For those of us who would like to try something different and leave behind the fizzy Alka-Seltzer-on-steroids dye tablets, I have just the thing for you. Thanks to the folks at DIY-Enthusiasts, we’re sharing 10 eco-friendly Easter eggs decorating ideas that have brilliant results.
Making Egg Dye from Plants, Fruits and Herbs
Making your own natural egg dye is a great way to teach children about green living, and the results are just as fab, if not more so, than the store-bought alternative. The recipe to make dye is essentially 1 cup of each particular veggie or fruit per 1 cup water. For herbs (say for example, turmeric) you’ll only need a few tablespoons of the ground herb. You can also use tea bags to make your dye, in which case you’ll only need 1 bag per 1 cup of water. Boil the dye material in the water for 15-20 minutes, until the liquid is a few shades darker than your intended final color, strain the solids and then chill the dye. Add 1 tablespoon of white vinegar to each cup of strained dye liquid after chilled and you’re ready to go!
Here are some ideas for colors and what to use
Please note that the color listed is the color you’ll get if you’re using white eggs. Brown eggs will result in a different color!
- Blue: Purple Cabbage
- Gray: Dried Hibiscus Flowers
- Pink: Shredded Beets
- Mustard Yellow: Ground Tumeric
- Lavender: Red Onion Skin or Grape Juice or Red Zinger Tea
- Orange: Yellow Onion Skin
- Brown: Coffee
- Rich Yellow: Carrot
- Pale Green: Spinach
- Various Shades: Bags of Chamomile or Green Tea
Decorating with Seeds, Cereal and Pasta
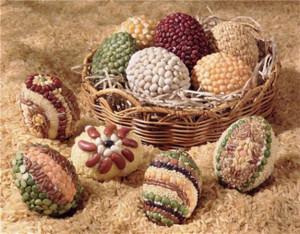
This is an advanced move, no seriously, it’s difficult. To start, you use raw eggs, but blow the egg yolk and whites out so it’s an empty egg shell. (This is accomplished by poking a small hole in each end of the egg and blowing out the insides.) Totally easy, right? I remember trying this when I was 10, it didn’t go well. Just be prepared for a certain level of…frustration. That being said, the end result is spectacular, I mean, just look at that photo! If you have the patience of a saint, some experience with mosaic tile laying, a full set of surgical tools and 2 assistants, you can create works of art that will rival the ones in the photo.
I decided that I should give this eco-friendly Easter eggs decorating method another try. It’s been 28 years since my last attempt to disembowel a raw egg and decorate it, and I figure with this much life experience it’ll be “in the bag” this time around.
Here goes! Because this is an eco-friendly DIY project, I selected my seeds and beans from the bulk section at Whole Foods, because when you buy in bulk you reduce your carbon footprint. I chose “Lundberg Family Farm” Organic Olde World Pilaf, baby lima beans, and sprouted mung beans. I also picked up some chocolate covered chia seeds to give my egg that healthy but “fun” design element. Note: don’t use chocolate covered anything in this project, the chocolate melts. Also, don’t use sprouted mung beans, their skin falls off, it’s no good.
Removing the innards of the egg was less tricky than I remembered. I took two thumbtacks, poked holes in each end of the egg, one larger than the other. Here’s the important part: you must stab the inside of the egg with a chopstick to break up the yolk, otherwise it will NOT come out. After “scrambling” the inside of the egg, blow into the smaller hole and the insides will come out of the other one. This process is not for the faint of heart.
Decorating the egg. If you use Elmer’s glue, you have to glue one side at a time, allowing the first side to dry completely before attacking the second side. The egg decorating process will then take at least a day. If you use Krazy Glue or a hot glue gun, you will achieve a quicker and higher success rate, but the toxicity level of your faux fabergé egg will be increased. I elected to use Krazy Glue, in the interest of saving time. I also attempted to create an egg with Elmer’s and sadly I don’t recommend it; the decorations oozed all over and I was unable to achieve any sort of “design.”
That aside, I think my egg turned out OK! This is the “good” egg. 😉
I hope you enjoy trying some of these eco-friendly egg decorating techniques. I can honestly say I had a great deal of fun preparing mine!
Here’s a link to the full article on DIY-Enthusiasts.